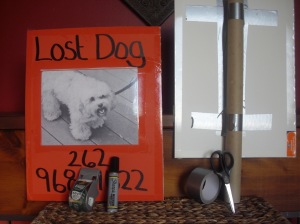
Posting signs is one of the most effective things you can do to get your lost dog back home.  But it’s important to realize that not all signs are created equally, meaning some are more effective than others. If you follow the steps below, you will be successful at both creating effective signs and putting them in the appropriate locations.
- Purchase the following supplies if you don’t already have them: seven colored foam poster boards that are at least 15” x 20”, rolls of clear and silver duct tape, a large Sharpie and scissors.
- Print one 8 ½” x 11” picture of your dog for each poster board.
- Write, “LOST DOG,” at the top of each poster board with your Sharpie.
- Tape a picture of your dog in the center of each poster board using clear duct tape, making sure to cover each picture entirely with clear duct tape to protect them from wet weather.
- Write a contact number below your dog’s picture.
- Waterproof your signs by covering their foam edges with clear duct tape.
- Put a sign in your yard so it can be seen easily by passers-by.
- Map a 3-mile area around the location where your dog went missing in the form of a hexagon.
- Secure signs at the intersections nearest to each point of the hexagon using your silver duct tape and scissors.
- Move your signs after each reported sighting of your dog by mapping a new 3-mile wide hexagon around the spot where your dog was most recently seen, and hanging signs at the intersections closest to each of the hexagon’s points.
- Last but not least, always make sure you have permission from the land owner before placing a sign, including city and county property.
